
Migrating to another virtual machine program can be intimidating. if
you already have your virtual machines set up they way you like them,
you don’t necessarily have to install them from scratch – you can
migrate your existing virtual machines.
VirtualBox and VMware use different virtual machine formats, but each
supports the standard Open Virtualization Format. Convert your existing
virtual machine to OVF or OVA and you’ll be able to import it into
another virtual machine program.
Unfortunately, this may not always work perfectly, as VirtualBox and
VMware both seem to use slightly different OVA/OVF implementations that
aren’t entirely compatible. If this doesn’t work, you may want to
reinstall your virtual machine’s guest operating system from scratch.
VirtualBox to VMware
Before migrating a virtual machine from VirtualBox to VMware, ensure
it’s “powered off” in VirtualBox – not suspended. If it’s suspended,
launch the virtual machine and shut it down.

Click the File menu in VirtualBox and select Export Appliance.

Select the virtual machine you want to export and provide a location for it.

VirtualBox will create a nOpen Virtualization Format Archive (OVA
file) that VMware can import. This may take some time, depending on the
size of your virtual machine’s disk file.

To import the OVA file in VMware, click the Open a Virtual Machine option and browse to your OVA file.

VirtualBox and VMware aren’t perfectly compatible, so you’ll probably
receive a warning message saying the the file “did not pass OVF
specification performance” – but if you click Retry, the virtual machine
should import and function properly.

After the process completes, you can boot the virtual machine in
VMware, uninstall VirtualBox Guest Additions from the Control Panel
inside the virtual machine, and install VMware Tools from the virtual
machine’s menu.
VMware to VirtualBox
Before migrating a virtual machine from VMware to VirtualBox, ensure
it’s “powered off” in VMware – not suspended. If it’s suspended, launch
the virtual machine and shut it down.

Next, browse to the OVFTool folder. If you’re using VMware Player,
you’ll find it at C:\Program Files (x86)\VMware\VMware Player\OVFTool.
Hold Shift, right-click inside the OVFTool folder, and select Open
command window here.

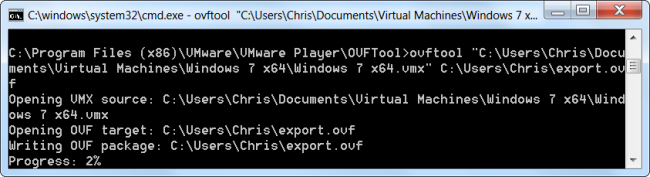
Run ovftool with the following syntax:
ovftool source.vmx export.ovf
For example, if we wanted to convert the virtual machine located at
C:\Users\NAME\Documents\Virtual Machines\Windows 7 x64\Windows 7 x64.vmx
and create a new OVF file at C:\Users\NAME\export.ovf, we’d run the
following command:
ovftool “C:\Users\NAME\Documents\Virtual Machines\Windows 7 x64\Windows 7 x64.vmx” C:\Users\NAME\export.ovf
If you receive a “failed to open disk” error, it’s likely that the
virtual machine is still running or wasn’t shut down properly – boot the
virtual machine and perform a shut down.
Once the process is complete, you can import the .ovf file into VirtualBox. Use the Import Appliance option in the File menu.

After the process completes, you can boot the virtual machine, uninstall VMware Tools, and install VirtualBox’s Guest Additions.
Comments
Post a Comment